Configure and Setup PayPal IPN
PayPal IPN or Instant Payment Notification is a notification service wherein PayPal servers notify merchants about transaction events. These notifications are sent to a configured web url which can understand and act upon them. These notifications are can put to impressive usage and can help you almost full automate the end-to-end purchase to delivery process. Its easy to configure and setup PayPal IPN messages and that is what we are going to take head on in this article.
Creating a PayPal Merchant Account
IPN Messages are a way for PayPal to notify merchants about updates to their transactions. This service, therefore, is available only for merchants, i.e. companies/individuals who sell products or services using PayPal. Being a PayPal merchant means having a Premier or Business account with PayPal. Sign up for one if you haven’t done so already. If you have an individual, personal or a student account, then the IPN service will not be active and won’t show up in your account.
You can also upgrade your account from a personal/individual account to a premier or business account. However, note that one you do so, all payments that you receive in your account will have to bear the $0.30 + some percentage (depending on your account standing and location) of the amount. If you primarily use PayPal for making payments and occasionally receive personal payments, then its always better to have another PayPal account. PayPal allows all users to have 2 accounts – 1 personal and 1 business.
Enabling IPN Messages
IPN Message service is inactive by default and needs to be turned on manually. Follow the steps below to turn on and setup PayPal IPN messages
Account Login
Login to your PayPal Premier or Business account. Navigate to the My Selling Tools as shown under the Profile option in the main menu.
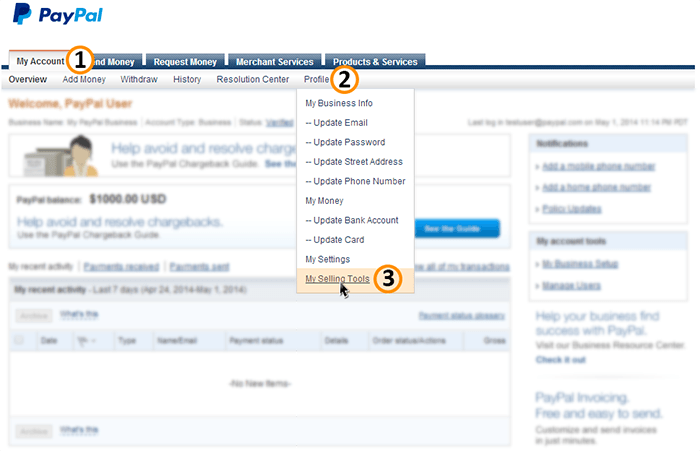
Note – Users in some locations might not see this as an available option here. They can click on the Profile option and then on the ‘My Selling Tools’ option as will be shown on the left side in the page that loads next.
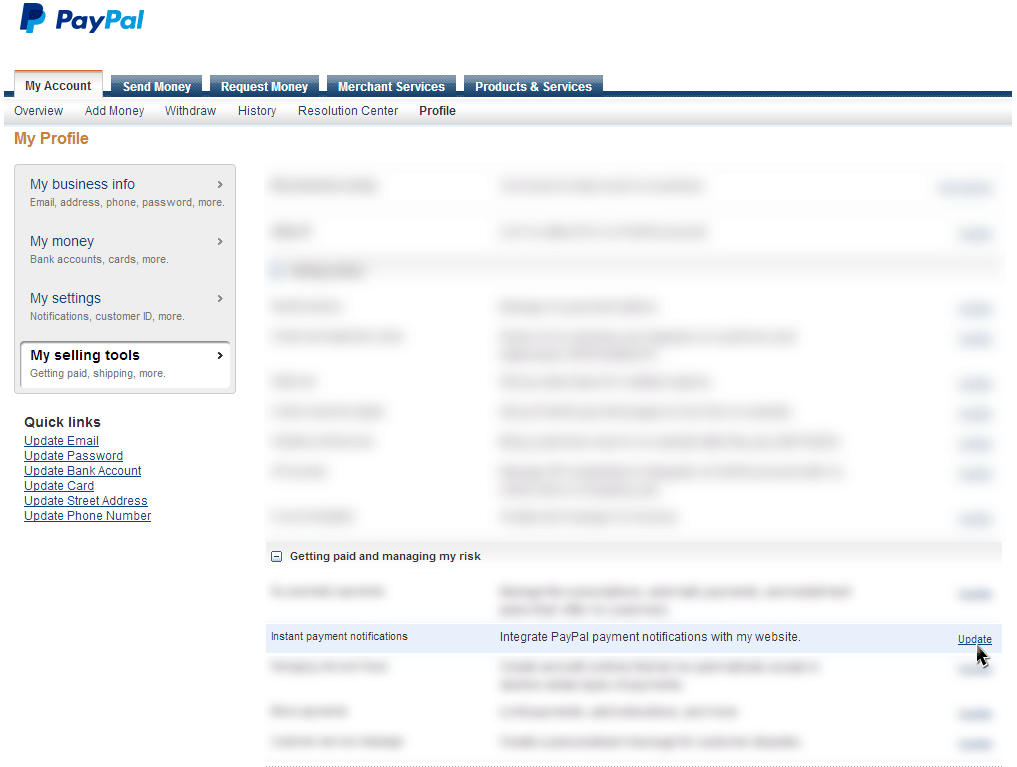
Update Instant Payment Notifications
Locate the Getting paid and managing my risk section click on the Update link as shown next to the Instant payment notifications option.
Choose IPN Settings
After clicking on the Update link, read through the page that loads and click on the Choose IPN Settings button.
Edit Instant Payment Notification (IPN) Settings
What follows is a page that asks you to enter a Notification URL. A notification URL is a web location which has the IPN script that one would like the messages to be delivered to. In simple words, it is a file (mostly on your webserver) which contains the logic to receive and act upon notification messages for transactions which are sent by PayPal. Right now, we haven’t gone through writing up that easy script yet, and we’ll do that in just a short while. All you need to do now is to mention the name of the file which will have the IPN script and will be stored on your webserver. Here, we are naming the file ‘returnURLForIPN.php‘ and we plan to save it in the root folder on the website www.your-website.com. Replace your-website.com with your own domain and returnURLForIPN with the filename you wish to have.
Secondly, select the Receive IPN messages (Enabled) option.
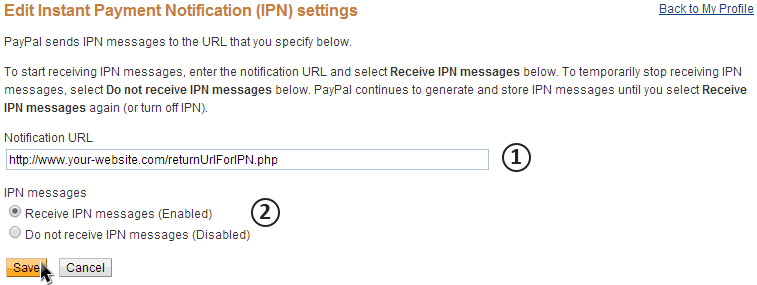
Click on the Save button and IPN will be enabled. Yes, you are half way through to setup PayPal IPN messages.
Setup PayPal IPN
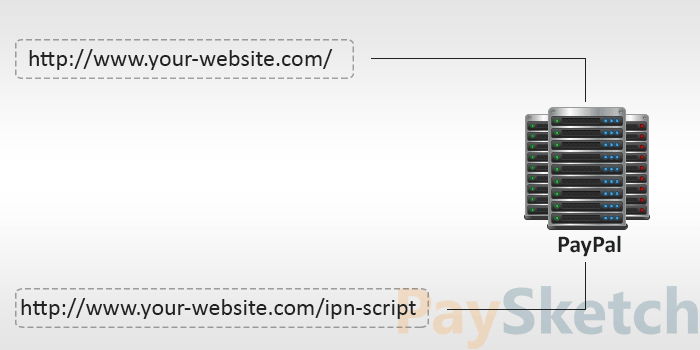
So we are done enabling and configuring IPN on our PayPal account. But the other part of the spectrum still remains to be covered. Before we cover that, lets dig a bit deeper into how the IPN system works. Below is detailed 5 step request-response message exchange stack of the communication that happens between your website/server and PayPal when it comes to IPN.

Web form: A page on your website which has the pay now/buy now button or script that directs users to PayPal so that they can make payments for goods/services that you sell online.
IPN Script: A script which can read and interpret IPN messages.
Message stack
- A potential buyer clicks on shopping cart payment button to make a payment and gets redirected to PayPal’s payment page for the same.
- Upon successful payment, PayPal notifies the IPN script stored on your web server (http://www.your-website.com/returnURLForIPN.php) with a message meta-data.
- To ensure that the notification is authentic, the script initiates a connection with PayPal and requests for validation.
- PayPal responds back with validation results.
- Upon receiving the response, the script acts accordingly.
- Actions on valid response are taken. Example, sending an email to the buyer, stopping a shipment due to a dispute or stop payment
PayPal IPN PHP Code Example
Now that you know how IPN works, let us quickly write down all the PHP code for the IPN script and complete the setup of PayPal IPN, so that your system’s backed starts receiving IPN messages.
To start with, we’ll first capture the message from PayPal and store everything in an array. Here, we have all variables and their values stored in the array $dataFromPayPal
|
1 2 3 4 5 6 7 8 9 10 |
<?php $post_data = file_get_contents('php://input'); $post_array = explode('&', $post_data); $dataFromPayPal = array(); foreach ($post_array as $keyval) { $keyval = explode ('=', $keyval); if (count($keyval) == 2) $dataFromPayPal[$keyval[0]] = urldecode($keyval[1]); } ?> |
Now, to verify and validate the request and the transaction, we will compose a message to be sent as a request back to PayPal. Note that we start the request by appending a variable ‘cmd’ whose value is ‘_notify-validate‘. Then, we add all the URL variables and their values which were received in the IPN notification message.
|
1 2 3 4 5 6 7 8 9 10 11 12 13 14 |
<?php $req = 'cmd=_notify-validate'; if(function_exists('get_magic_quotes_gpc')) { $get_magic_quotes_exists = true; } foreach ($dataFromPayPal as $key => $value) { if($get_magic_quotes_exists == true && get_magic_quotes_gpc() == 1) { $value = urlencode(stripslashes($value)); } else { $value = urlencode($value); } $req .= "&$key=$value"; } ?> |
Posting IPN data back to PayPal will help validate the notification
|
1 2 3 4 5 6 7 8 9 10 11 12 13 14 15 16 17 |
<?php $ch = curl_init('https://www.paypal.com/cgi-bin/webscr'); //use https://www.sandbox.paypal.com/cgi-bin/webscr in case you are testing this on a PayPal Sanbox environment curl_setopt($ch, CURLOPT_HTTP_VERSION, CURL_HTTP_VERSION_1_1); curl_setopt($ch, CURLOPT_POST, 1); curl_setopt($ch, CURLOPT_RETURNTRANSFER,1); curl_setopt($ch, CURLOPT_POSTFIELDS, $req); curl_setopt($ch, CURLOPT_SSL_VERIFYHOST, 2); curl_setopt($ch, CURLOPT_FORBID_REUSE, 1); curl_setopt($ch, CURLOPT_HTTPHEADER, array('Connection: Close')); if( !($res = curl_exec($ch)) ) { curl_close($ch); exit; } curl_close($ch); ?> |
Now, when the script hears back from PayPal, there can be a number of cases. We will try to cover as many as possible, but you might want to add more as per your choice and requirement. Fill in the blanks by writing custom actions that you would want to take in case of payment completion or failure. We recommend that you send emails to buyers in case of denied, failed or expired payments along with stopping their shipments. This will ensure that customers know why their orders were canceled and can re-order using a different payment mode or method.
|
1 2 3 4 5 6 7 8 9 10 11 12 13 14 15 16 17 18 19 20 21 22 23 24 25 26 27 28 29 30 31 32 33 34 35 36 37 38 39 40 41 42 43 44 45 46 47 48 49 50 51 52 53 54 55 56 57 |
<?php function paymentComplete() { //email the buyer that payment is complete and that products will be shipped soon. Enter details about the same in database. } function paymentIncomplete() { //email the buyer that payment is not complete } function paymentReversedOrRefunded() { //take note of the reversal or refund in your system/database and pause any shipment related to this order } function reversalCanceled() { //a payment that was reversed has been canceled. You can now ship the products for the said transaction } if (strcmp ($res, "INVALID") == 0) { //invalid access to the IPN Script or something wrong with the transaction parameters } else if (strcmp ($res, "VERIFIED") == 0) { $payer_email = $_POST['payer_email']; $userEmailId = strtolower($payer_email); $paymentStatus = $_POST['payment_status']; $paypalTransactionID = $_POST['txn_id']; $totalPaymentReceived = $_POST['mc_gross']; if($paymentStatus == "Reversed" || $paymentStatus == "Refunded") { //call function to act for payment reversal or refund - you would probably want to stop shipment or request the buyer to return the product paymentReversedOrRefunded(); } else if($paymentStatus == "Pending" || $paymentStatus == "Denied" || $paymentStatus == "Failed" || $paymentStatus == "Voided" || $paymentStatus == "Expired") { //pause shipment and inform buyer about the status of payment paymentIncomplete(); } else if($paymentStatus == "Canceled_Reversal") { //reversal to the payment was canceled. You might now want to inform the buyer that the product is ready to be shipped as the payment as been received reversalCanceled(); } else if($paymentStatus != "Completed") { //finally, if payment is not completed, then act accordingly } //if all checks passed, then move further $receiver_email = $_POST['receiver_email']; if($receiver_email != "<your_email_address_here>") { die("Invalid payment"); } if($paymentStatus == "Completed" || $paymentStatus == "Processed") { $itemName = $_POST['item_name']; $item_number = $_POST['item_number']; $currency = $_POST['mc_currency']; paymentComplete(); } else { die("Error! Payment not complete or processed"); } } ?> |
That’s it folks. We have now completely configured and setup PayPal IPN messages. You can test this on PayPal Sandbox before bringing it to your live website/store. Feel free to make changes to the script above while using it. For any questions, suggestions or improvements, please log a comment below.


A perfect starting point for me and made it very easy for me to set up a listener for PayPal. Thanks a million for the useful tutorial!
Thank you PaySketch. Very clean explanation and clean coding. I tho recommend editing and changing the “eversalCanceled()” Function Line:
function reversalCanceled() [
To this:
function reversalCanceled() {
Thank you.
Thanks for the heads up Mike!
I’ve made the changes and updated the tutorial.