PayPal Auto return URL
Wouldn’t it be nice to get buyers back to your website after they complete the payment process? You could greet them with a thanks, a summary and status of their order, and even allow them to download digital goods post payment confirmation. The PayPal auto return functionality lets you do just that – automatically redirect buyers back to your website right after they confirm and pay for the goods or services. Besides helping to complete the ordering process, this allows you to get notified, capture buyer presence and personalize their purchase process.
How to generate PayPal Auto Return URL
Before we get to generate the auto return URL for your PayPal account, keep note of a few basic but important things:-
- The auto return URL is a webpage where you’d like your buyers to be redirected post payment. Therefore, you need to have this page as a valid existent entity before proceeding to generate PayPal auto return URL. Start by creating a new page and for ease, save it on the root of your website’s web directory.
- Write up a bit of code logic for validating the page request – this will save you tonnes of time and money in case you are selling digital downloads. See PayPal PDT Sample Code in this post to get an idea.
- Always try to enhance the buyer’s experience with personalized greetings – such as ‘Thanks for placing the order John’, instead of ‘Thanks for placing the order’.
- The Return URL will be applied universally to all Auto Return payments. This can be overridden by mentioning separate return URLs in the payment buttons that you’ve created in your PayPal profile.
Follow the steps below to generate PayPal auto return URL:-
- Login to your PayPal business account. Note that auto return functionality is meant for businesses/merchants who wish to bring buyers back to their website after payment completes. Therefore, this functionality is available only to PayPal premier or business account holders. If you don’t have either, you can create or also upgrade your PayPal account.
- Navigate to My Selling Tools by hovering over the Profile option from the top level menu. You can also click here and enter your PayPal credentials to view the Summary Page, where you can click on the ‘My Selling Tools’ from the left hand side menu that shows up after the page loads.
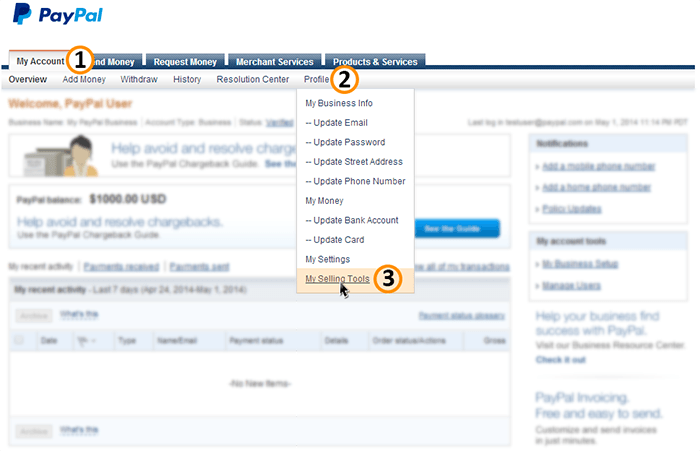
- Locate the Website Preferences option as will be shown under the Selling online category. Click on the Update button that shows next to it.
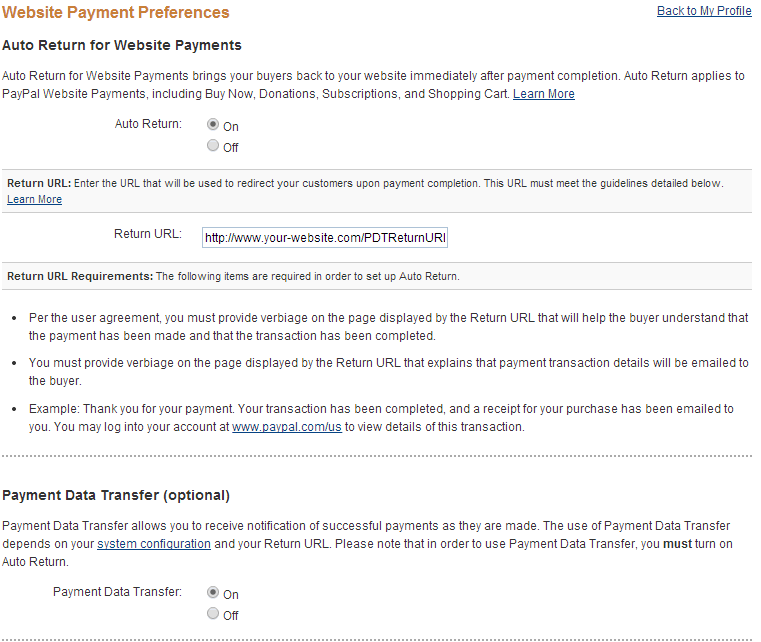
- You will now see the Website Payment Preferences with a few options for Auto Return for Website Payments.
Options for PayPal Auto Return URL
- Auto Return: Select On for this radio option to enable the auto return functionality for payments. This will ensure that buyers are almost immediately redirected back to your website after they complete the payment process.
- Return URL: This is what the whole post is about – the auto return URL – this is where you mention the link to your webpage where you wish to redirect your buyers.
- Payment Data Transfer: This is optional, but we recommend that you turn this on as well. It will help you validate payments and personalize the purchase process.
Scroll to the bottom of the page and click on the Save button to save the settings.
As soon as your page is saved, you will see a PDT Identity token. Copy and save this token – its your credential to access and call PayPal servers to validate transactions and will be required only if you wish to setup and configure PayPal PDT.
Auto Return Page
The auto return page can be a simple HTML page with a Thank you message. Here’s a sample code for the same:-
|
1 2 3 4 5 6 7 8 9 10 |
<html> <head> <title>Thanks!</title> <body> <h1>Thanks for placing an order with us</h1> <!-- <p>You can write more content, instructions etc here</p> --> </body> </html> |
Alternatively, you can have also write the complete purchase process code logic right from validating a transaction, payment, buyer to emailing updates about the order status etc. For that, refer to setting up PayPal PDT and PayPal IPN.


hey guys! thanks a lot of this amazing tutorial on setting up auto return url for paypal. this will really help me customize my after payment page and i’m sure my customers will love the personal touch (as mentioned in your post).