Setup PayPal PDT (with PHP sample code)
PayPal PDT (Payment Data Transfer) is a method to redirect buyers and customers back to your website. PDT allows PayPal merchants to securely fetch details about a transaction and display order information, confirm payment, check for status, update databases, allow digital downloads, send out software licenses and queue orders for fulfillment. If done correctly, PDT can really help automate the complete process from payment to delivery. It is vitally helpful for merchants who use PayPal to sell digital content as the downloads can be made available right after a payment is made and confirmed. PayPal PDT is really easy to setup and your website gets rolling in a few minutes; we will show you just that in this tutorial.
How PayPal PDT works
Before jumping to your live website, we’ll take a glimpse of how the whole PDT thing actually works. Basically, we will take a quick look at the request-response messages that are exchanged between your customer, your website and PayPal. Below is a graphic representation of the PDT request-response message stack.
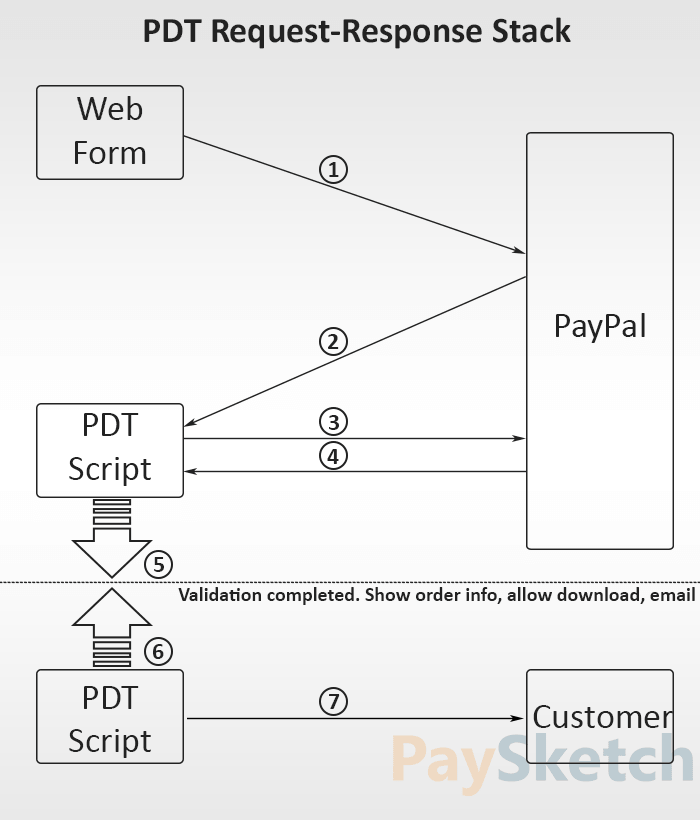
At the simplest, there are 7 steps involved in PDT right from when a customer clicks the Buy button on your website up until he sees an order confirmation message. Below are definitions of a few keywords that you see in the stack image above and description about the exchanges messages in order.
Web form: A page on your website which has the pay now/buy now button or script that directs users to PayPal so that they can make payments for goods/services that you sell online.
PDT Script: A script to which the PDT redirect URL points and redirects to after the payment is complete. This script executes to confirm details, validates the transaction and could greet your customer with a payment or order confirmation message.
PayPal: Here, we refer PayPal to the PayPal servers which handle all the communication back and forth between your website, itself and your customer.
Customer: Someone who helps drive your business and contributes to your organization by purchasing offered goods or services.
Now here is a complete run-through of the exchanged messages. Note that you don’t get to see these messages (even if you keep your eyes wide open); they happen in the background and in digital jargon.
- The first message is triggered when a potential customer clicks on the Buy button on your website. This requests PayPal to show the available payment methods (paypal balance, credit card, debit card, bank transfer etc) so that the good can be paid for and purchased. If you don’t have PDT setup yet, then this will be the end of exchanged messages and flow of the purchase process. Both you and the customer will get an automated payment received and sent email notifications respectively.
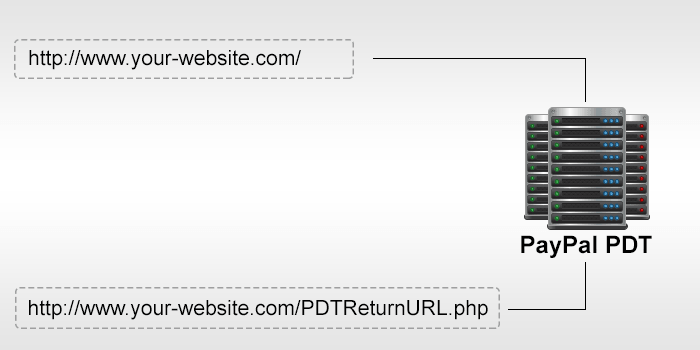
- Post payment, a message is sent from PayPal to the return URL that you had specified to return customers to. The return URL is accessed with certain parameters appended to it. For example, if you specified the return URL to be http://www.your-website.com/PDTReturnURL.php, then the first parameters and value append to it would be tx=<transaction_id>. These will be followed by other parameters and their values such as amount, quantity, product id etc.
- Upon receiving the values from the second message, your script would validate these locally and then send a request to PayPal for confirmation. This step ensures that the second message (and access to your PDT redirect URL) was sent from PayPal and not by anyone/anything else.
- If the transaction is verified, PayPal responds back with complete transaction details.
- Your script can now validate each and every attribute of the transaction, starting from item, order quantity, price, currency etc.
- Upon complete verification, the PDT script will jump to execute further processing of the order.
- The last message is exchanged between your website/PDT Script and the customer. You can show information related to the order, payment, shipping, downloads, license etc.
Creating a PayPal Premier or Business Account
The Payment Data Transfer facility is available to PayPal merchants, i.e. people who sell goods and services using PayPal. To so so, you need to either have a PayPal Premier or a Business account. Make sure that you are going to sell stuff if you sign up for one of these types of accounts as you will start getting charged for all payments that you receive in your account. Click here to know more about account types. If you have a personal account with PayPal, then you can upgrade PayPal account to Premier or Business and start accepting payments while selling things online. Additionally, PayPal allows you to keep 2 accounts – 1 personal and 1 business. So, you can sign up for another account of Business type in case you don’t wish to upgrade your personal account.
Enable PayPal PDT
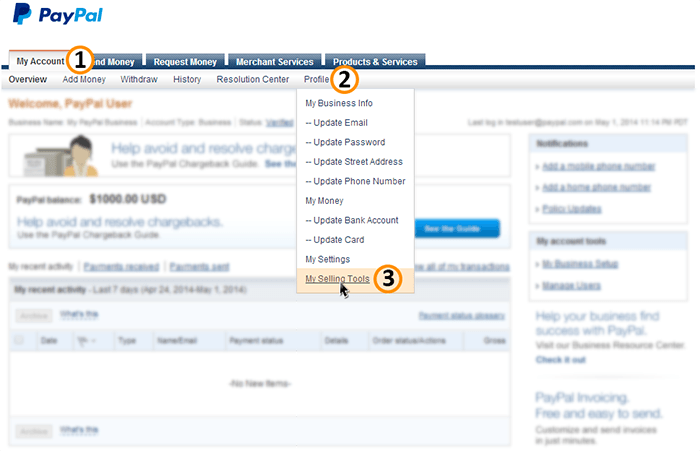
PDT is disabled by default and needs to be enabled manually. To do so, login to your PayPal account and from the main menu navigate to Profile -> My Selling Tools. Now this option might not be visible to PayPal account holders in all countries – they can simply click on the Profile link and then select My Selling Tools from the left hand side descriptive menu that shows up when the page loads. This is where you need to click:-
Now, click on the Update link as it shows ups for Website Preferences under the Selling online section. Doing so will reload the page and present a high list of options, radio buttons and fields to fill in.
PayPal PDT Return URL
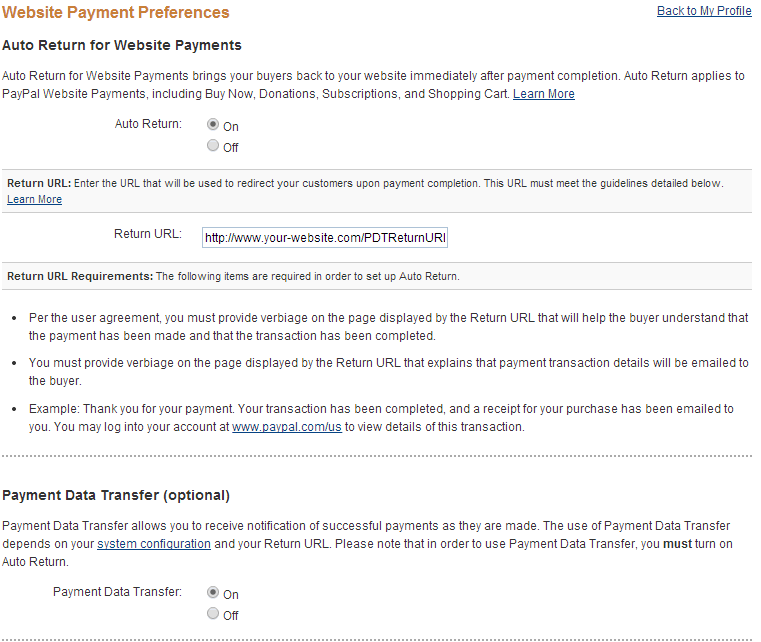
The Website Payment Preferences shows a list of all preferences which you can configure for receiving payment. The ones we are concerned with are:-
- Auto Return for Website Payment – select the On option for this preference. When turned on, this ensures that all the customers are immediately redirected back to your website after completing the payment.
- Return URL – The return URL is the web address to which you wish to bring back your buyers. The file at this location will contain our PDT script which gets executed right when the user is directed to this URL. In the tutorial, we’ve named the file PDTReturnURL.php and placed it under the root folder of the website. You can change the name as per your liking.
- Payment Data Transfer – select the On option for this preference as this will turn on PDT for your account.
That’s it for the settings. Just scroll down and click on the Save button to save these.
PayPal PDT Identity Token
The PDT Identity token is an alpha-numeric string of characters which uniquely identifies your account. This is necessary so that PayPal only allows only authorized requests for transaction details. If this were not to exists, anyone could request for a transaction details by just knowing the transaction id. The identity token basically safeguards access to the transaction data in your account. Right after you clicked the Save button on the Website Payment Preferences, you would have been directed to the My Profile page where a message ‘You have successfully saved your preferences. Please use the following identity token when setting up Payment Data Transfer on your website’ would have shown up in a box with the PDT identity token.

Generating the Identity token completes all the PDT configuration that could be done from your PayPal account. Now what’s left is for us to write a simple PDT Script which will run on your website’s server, to which the customers will be directed post payment.
PayPal PDT Sample Code in PHP
The PDT Code comprises of 3 basic functions:-
- Grab and interpret the URL parameters
- Validate transaction details from PayPal
- Execute a script to show order details, update database, initiate file download etc.
Generic functions
|
1 2 3 4 5 6 7 8 9 10 11 12 13 14 15 16 17 18 19 20 21 22 23 24 25 26 27 28 |
function showOrderDetails() { //echo order details } function sendEmailToBuyer($emailAddress) { //send a thank you email to buyer } function checkIfTransactionHasAlreadyBeenProcessed($tx) { //check if transaction with this id has already been process } function checkThatPaymentIsReceivedAtYourEmailAddress($email) { //check $email againt the email address which was suppose receive the payment } function checkPaymentAmountAndCurrency($amount, $currency) { //verify that the amount and currency code are as required. } function processOrder() { // process the order } function exitCode() { die("Error"); //exit with error message } |
Grab Transaction Id from URL
|
1 2 3 4 5 6 7 8 |
//look if the parameter 'tx' is set in the GET request and that it does not have a null or empty value if(isset($_GET['tx']) && ($_GET['tx'])!=null && ($_GET['tx'])!= "") { $tx = $_GET['tx']; verifyWithPayPal($tx); } else { exitCode(); } |
Validate Transaction by communicating with PayPal and execute script to process order
|
1 2 3 4 5 6 7 8 9 10 11 12 13 14 15 16 17 18 19 20 21 22 23 24 25 26 27 28 29 30 31 32 33 34 35 36 37 38 39 40 41 42 43 44 45 46 47 48 49 50 51 52 53 54 55 56 57 58 59 60 61 62 63 64 65 66 67 68 69 70 71 72 73 74 75 76 77 78 79 80 81 |
<?php function verifyWithPayPal($tx) { $req = 'cmd=_notify-synch'; $tx_token = $tx; $auth_token = "siw1VZH10S_RgptHvNvJXJ6bhjbd8sdbfjhsbj43jju9lF7d1sKSclIC"; $req .= "&tx=$tx_token&at=$auth_token"; // post back to PayPal system to validate $header = "POST /cgi-bin/webscr HTTP/1.0\r\n"; $header .= "Content-Type: application/x-www-form-urlencoded\r\n"; $header .= "Content-Length: " . strlen($req) . "\r\n\r\n"; // url for paypal sandbox //$fp = fsockopen ('ssl://www.sandbox.paypal.com', 443, $errno, $errstr, 30); // url for payal // $fp = fsockopen ('www.paypal.com', 80, $errno, $errstr, 30); // If possible, securely post back to paypal using HTTPS // Your PHP server will need to be SSL enabled $fp = fsockopen ('ssl://www.paypal.com', 443, $errno, $errstr, 30); if (!$fp) { exitCode(); } else { fputs ($fp, $header . $req); // read the body data $res = ''; $headerdone = false; while (!feof($fp)) { $line = fgets ($fp, 1024); if (strcmp($line, "\r\n") == 0) { // read the header $headerdone = true; } else if ($headerdone) { // header has been read. now read the contents $res .= $line; } } // parse the data $lines = explode("\n", $res); $response = array(); if (strcmp ($lines[0], "SUCCESS") == 0) { for ($i=1; $i<count($lines);$i++){ list($key,$val) = explode("=", $lines[$i]); $response[urldecode($key)] = urldecode($val); } $itemName = $response["item_name"]; $amount = $response["payment_gross"]; $myEmail = $response["receiver_email"]; $userEmailPaypalId = $response["payer_email"]; $paymentStatus = $response["payment_status"]; $paypalTxId = $response["txn_id"]; $currency = $response["mc_currency"]; // check the payment_status is Completed if($paymentStatus!="Completed") { paymentNotComplete($paymentStatus); } // check that txn_id has not been previously processed checkIfTransactionHasAlreadyBeenProcessed($paypalTxId); // check that receiver_email is your Primary PayPal email checkThatPaymentIsReceivedAtYourEmailAddress($myEmail); // check that payment_amount/payment_currency are correct checkPaymentAmountAndCurrency($amount, $currency); // process the order processOrder(); } else { exitCode(); } } fclose ($fp); } ?> |
So that is a skeleton of the PDT script in PHP. You can fill in details for the functions as per requirements and can choose to show order details, start digital downloads, generate and send software licenses, email customers and process their orders. We have tried to cover as many checks for validation and authenticity, but less us know if we might have missed anything important. Feel free to post your suggestions, comments, feedbacks and requests in the comments section below.
PS: In case you are interested in doing a combination of PDT and IPN, then read our tutorial to setup PayPal IPN.


Leave a Reply
Want to join the discussion?Feel free to contribute!