Settings Dashboard
The Settings Dashboard in PaySketch lets you quickly connect to and download data from PayPal using PayPal API Signature. Besides, it ensure security of your PayPal data by letting you create a user account, change interface settings and have multiple synchronization mechanisms.
The Settings Dashboard looks as follows:-
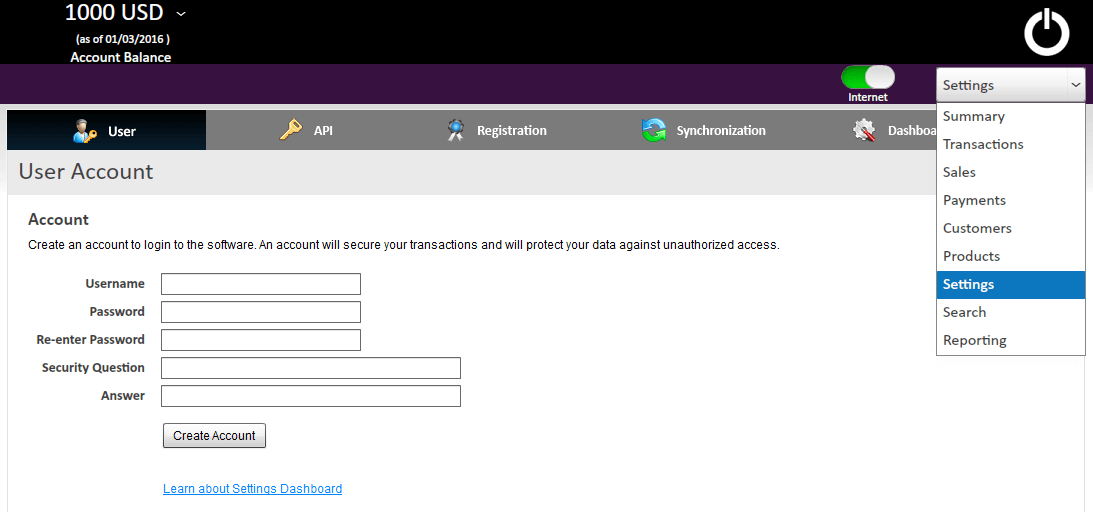
To navigate to the Settings Dashboard, select Settings from the dashboard selection dropdown menu.
Settings Dashboard Tabs
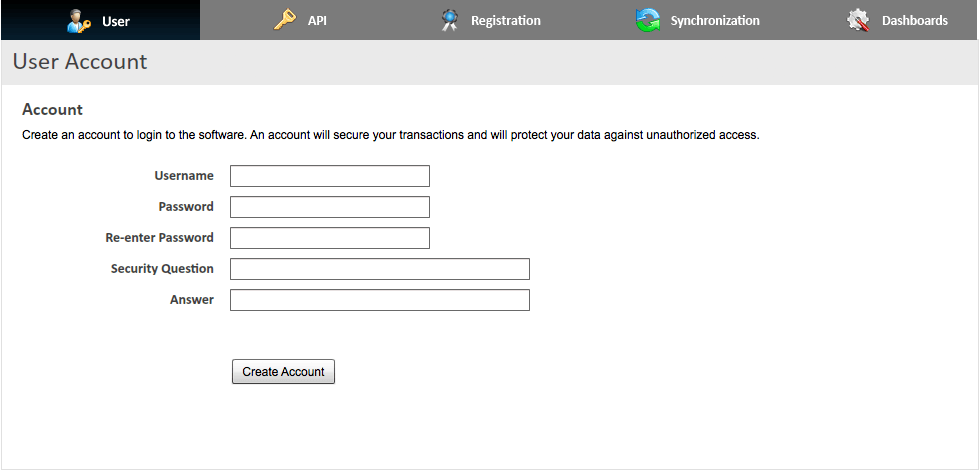
User
The User tab lets one create an account in PaySketch. A user account helps protect the data by limiting access only to the account holder. To create a user account in PaySketch, enter:-
- Username
- Password – the password needs to be atleast 6 characters long.
- Confirm the password
- Security question – in case one forgets the password, answering the security question will help resetting the same
- Security answer – answer to the security question is the key to resetting the password, whenever required.
Click on the Create Account and PaySketch will quickly do so for you. The next time you start PaySketch, you would be asked to enter the username and password before getting access to the software.
API
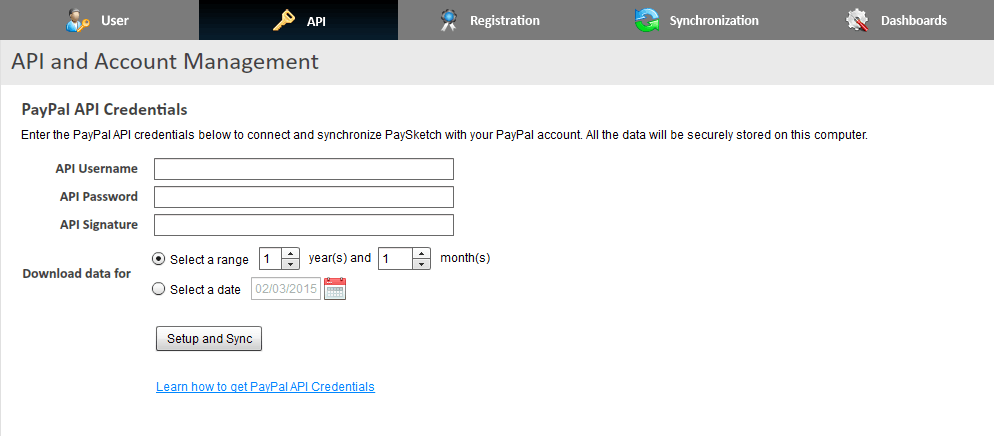
Clicking on the API tab will let you connect PaySketch to your PayPal account. You would need the PayPal API Credentials to setup and connect the two.
Enter the following details in respective fields and click on Setup and Sync.
- API Username
- API Password
- API Signature
- Select the years and months, or the exact data upto which you would want PaySketch to download and sync data from your PayPal account.
Once validated, PaySketch will automatically start downloading transactions and an activity indicator will appear next to the Internet connectivity indicator in the header section of the dashboard. Hover over the activity indicator and it will show details and progress for the data being downloaded. Until the download completes, you will not be able to use the Send Money or Refund features to maintain the integrity of your account transactions.
View and Add more PayPal Accounts
PaySketch allows users/businesses to add multiple PayPal accounts to PaySketch. To do so simply click the Add another Account button, enter your access password and fill up the PayPal API details. Click on Add account and wait for the confirmation message.
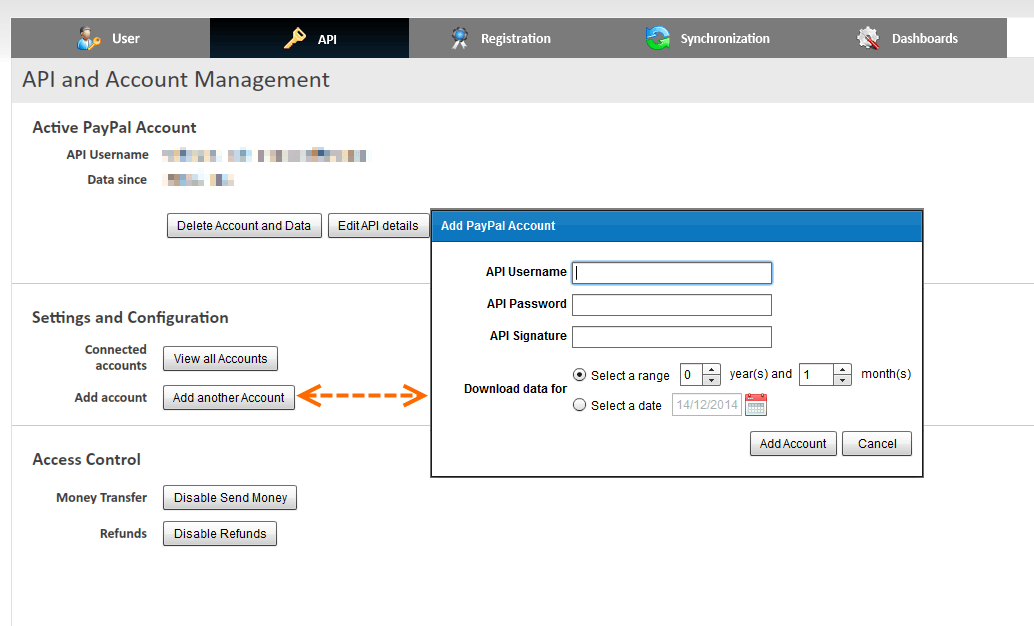
Adding an account will not activate it by default. This is to keep your currently active account in state with your ongoing work. To view and activate/delete connected accounts, click on the View all Accounts button. A window will list all the connected accounts – you can choose to Activate any listed account and restart PaySketch to get all analytics and reporting around the same. Deleting an account will permanently delete it from PaySketch, and you will have to re-connect and re-download the data.

These features are available only for Professional users
Disable Send Money and Refund
PaySketch allows users/businesses to disable the ability for users to transfer money out of the account, or to process refunds. To disable/enable simply click on the respective button and enter the PayPal API password. The application will acknowledge if you’ve entered the right password. Changes will take effect after the application restart.

This feature is available only for Professional users
Registration
Registering PaySketch will unlock its full potential to all the features for the Business or Professional version. The unregistered version can be ran for 25 times, 30 minutes everytime. It will also show data only for the most recent 100 transactions and has features such as Send Money and Refunds disabled. One also gets a complete year of unlimited email support with the yearly license or renewal.
Before proceeding with the registration, ensure that the computer is connected to the internet and the internet activity indicator shows the same.
The registration details are shown and emailed to you right after you purchase the software license. Enter the details in the respective fields and click on the Register button to register your copy of the software for a year from the date of purchase.
- Enter the email address
- Enter the Serial Key – exactly the same as is shown and emailed to you.
- Click on Register.
If you face any difficulties, simply click on the Contact Support button and the software will automatically open up your default email client. Enter your message/issue and send us an email.

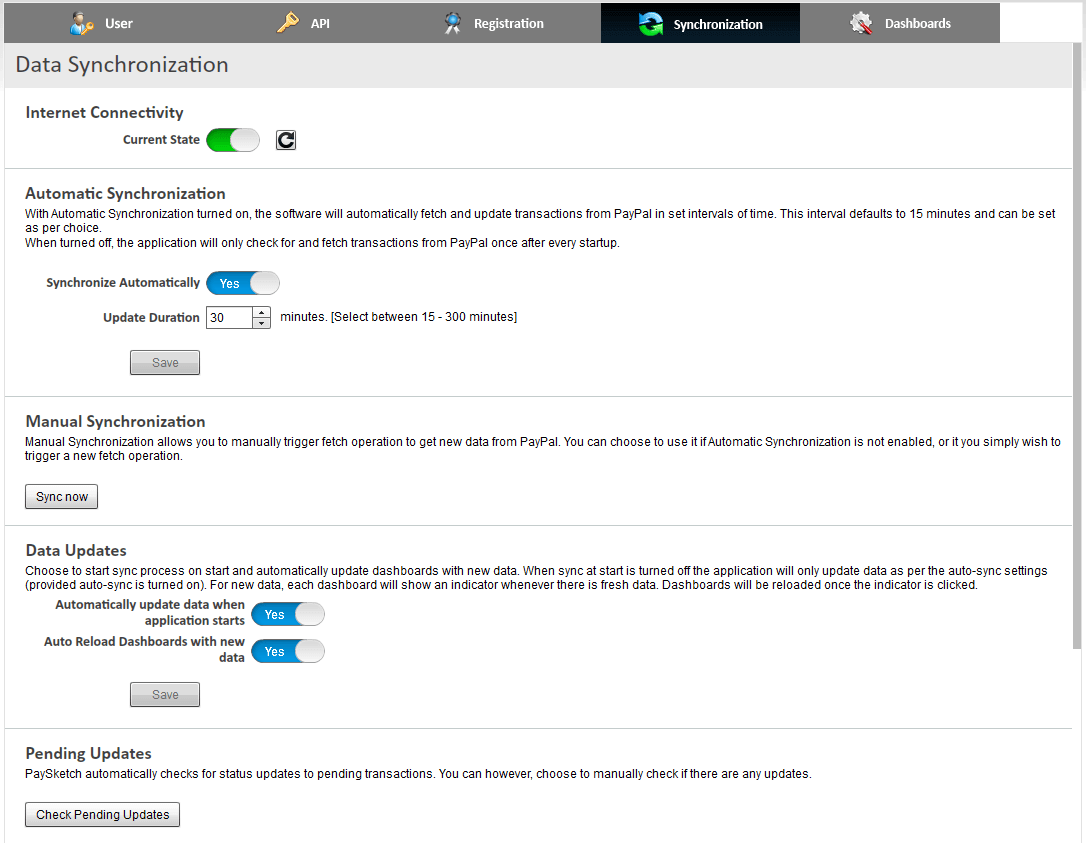
Synchronization
PaySketch gives you multiple option to remain connected with your PayPal account. The synchronization tab show the following ways in which you can configure PaySketch to download and update the data from PayPal servers.
Automatic Synchronization
Automatic Synchronization lets PaySketch automatically connect to your PayPal account and download transactions in set intervals of time. The functionality is active by default to 30 minutes i.e. every 30 minutes, PaySketch will connect to PayPal and check for newer transactions and changes. To disable, simply drag the indicator that shows Yes to the left and click on the Save button.
Update Duration to change the interval using the interval counter and click on the Save button.
Manual Synchronization
Clicking the Sync now button will quickly connect PaySketch to PayPal and download the latest transactions. This is a manual alternative to Automatic Synchronization.
Data Updates
You can disable the functionality that kicks off PaySketch to check for new data, as and when you start the application. Moreover, you can also switch off the feature that enables dashboards to auto-reload with new data while you are working on them.
Pending Updates
From time to time, PaySketch automatically checks for status changes to your transactions. You can prompt the application to do so right then by clicking on the Check Pending Updates button.
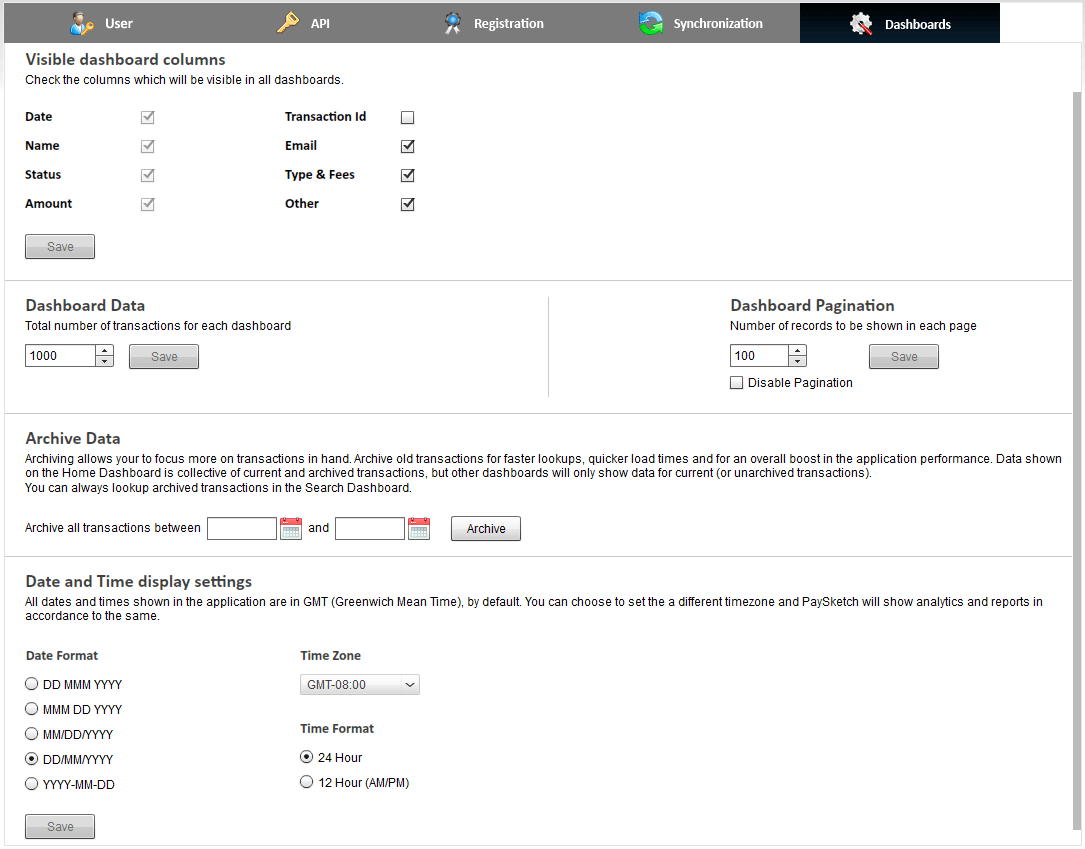
Dashboards
The Dashboards tab will help configuring multiple aspects of visible data in the dashboards across the application.
Visible dashboard columns
Check or uncheck the columns which you wish to see or hide from all the dashboard. By default, the date, name, status and amount columns will be checked and cannot be unchecked. The configurable columns are:-
- Transaction Id
- Transaction type
- Transaction Fee
Dashboard Data
This section lets you set the total number of PayPal transactions for which the data will be visible across all dashboards. This setting defaults to 1000, but can be configured to higher values, depending on the transaction limits set based on your software license. Click on the Save button to propagate the changes.
Dashboard Pagination
With Dashboard Pagination, you can set the number of records that will be visible on each page of a dashboard. The number can be configured from as low as 100 rows to as high as 1000 rows in each page. One can also disable pagination by checking the Disable Pagination checkbox. Click on the Save button to propagate the changes.
Archive Data
This feature is enabled only in the Professional version of PaySketch. If you are running the Business version, you can upgrade anytime by getting the upgrade.
Archiving transactions lets you focus more on the current transactions while archiving the older ones. Select a date range between which you wish to archive transactions. Data for archived transactions will not show up on any of the dashboard’s data sections. The other benefit of having transactions archived is to give PaySketch a performance boost, while letting it know to only search for transactions which are not archived.
Date and Time display settings
PaySketch lets you configure date and time settings as per your choice. Changes to these settings will be reflected in all date and time fields throughout the application. There are 5 formats of date and 2 formats for time to choose from:-
- DD MM YYYY
- MMM DD YYYY
- MM/DD/YYYY
- DD/MM/YYYY
- YYYY-MM-DD
- TimeZone selection
- 12 hour vs 24 hour time format
TimeZone – selecting a proper timezone is essential to all the data analytics that you see on PaySketch. By default, PaySketch shows all the numbers and does all the filtering around GMT. You should however, set the appropriate timezone (the one that matches with the timezone set in your PayPal account), so that there are no disparities/offsets in the dashboard numbers that you see. One example as to how this could effect the analytics – say your PayPal account is configured to report on Pacific timezone (GMT -8:00) and you get a sale on January 1st, 2016 at 02:00 AM GMT. Now if PaySketch is running with default settings (GMT) and you run the analytics/reporting to calculate monthly sales for December 2015/January 2016 or for the two entire years, there will be a different that you’ll notice in the numbers you get in reports from PayPal and from PaySketch. PayPal will account that sale in December of 2015, but since you’ve not set a timezone in PaySketch (it will pick up GMT) and report the sale to be in January 2016. But this is just program logic, and once you make the correct timezone settings and run the report again, you will see the data falling into the right buckets.
Click on the Save button to save the changes – these will show up the next time PaySketch restarts.
The PaySketch Settings Dashboard helps:-
- Create and manage PaySketch user account
- Connect PaySketch to PayPal through PayPal API Signature
- Register, Upgrade and Renew PaySketch
- Configure PaySketch Settings
- Download PayPal Transactions
- Automatically check PayPal for new transactions and sales
- Change visibility of columns across all dashboards
- Change the amount of data shown on dashboards
- Change pagination settings
- Archive Data for performance boost
- Change Date and Time formats